Study Journal
Study Journal is a gh element that allows you to display items in a journal format. That is, it is a table with a list of student grades that are stored in a separate application. The grades are the values of a particular field. Thus, the user can mark grades or the presence of students.

To assign a mark, the user needs to find the desired student and date. They are a row and a column. The user should click on the cell at their intersection. This opens a pop-up window with various fields. Usually, these are fields that must be filled in manually, such as Point and Tag. But it's up to you to decide which fields you want to place there. Returning to the user, after opening the pop-up window, the user can enter a mark and save the item.
If the user first puts a mark in a certain cell, then saving it creates a new item in the journal application. All further changes in this cell will only update that item.
Functional Characteristics
As mentioned above, the current element is used to give ratings and mark presence. More precisely, it was created for educational institutions. It allows you to create a full-fledged electronic journal and, due to its modes, users can have different levels of access to grades. That is, the journal can display the grades of the entire group in one subject and grades in all subjects for one student. The modes also allow the journal to be used for different needs and institutions. That is, it is suitable for use in schools, kindergartens, and various courses.
Subject By Lessons
The first mode is most suitable for forms of education that have a schedule. It can be a school, university, courses, or even clubs. This mode allows users to mark only the dates of scheduled lessons.
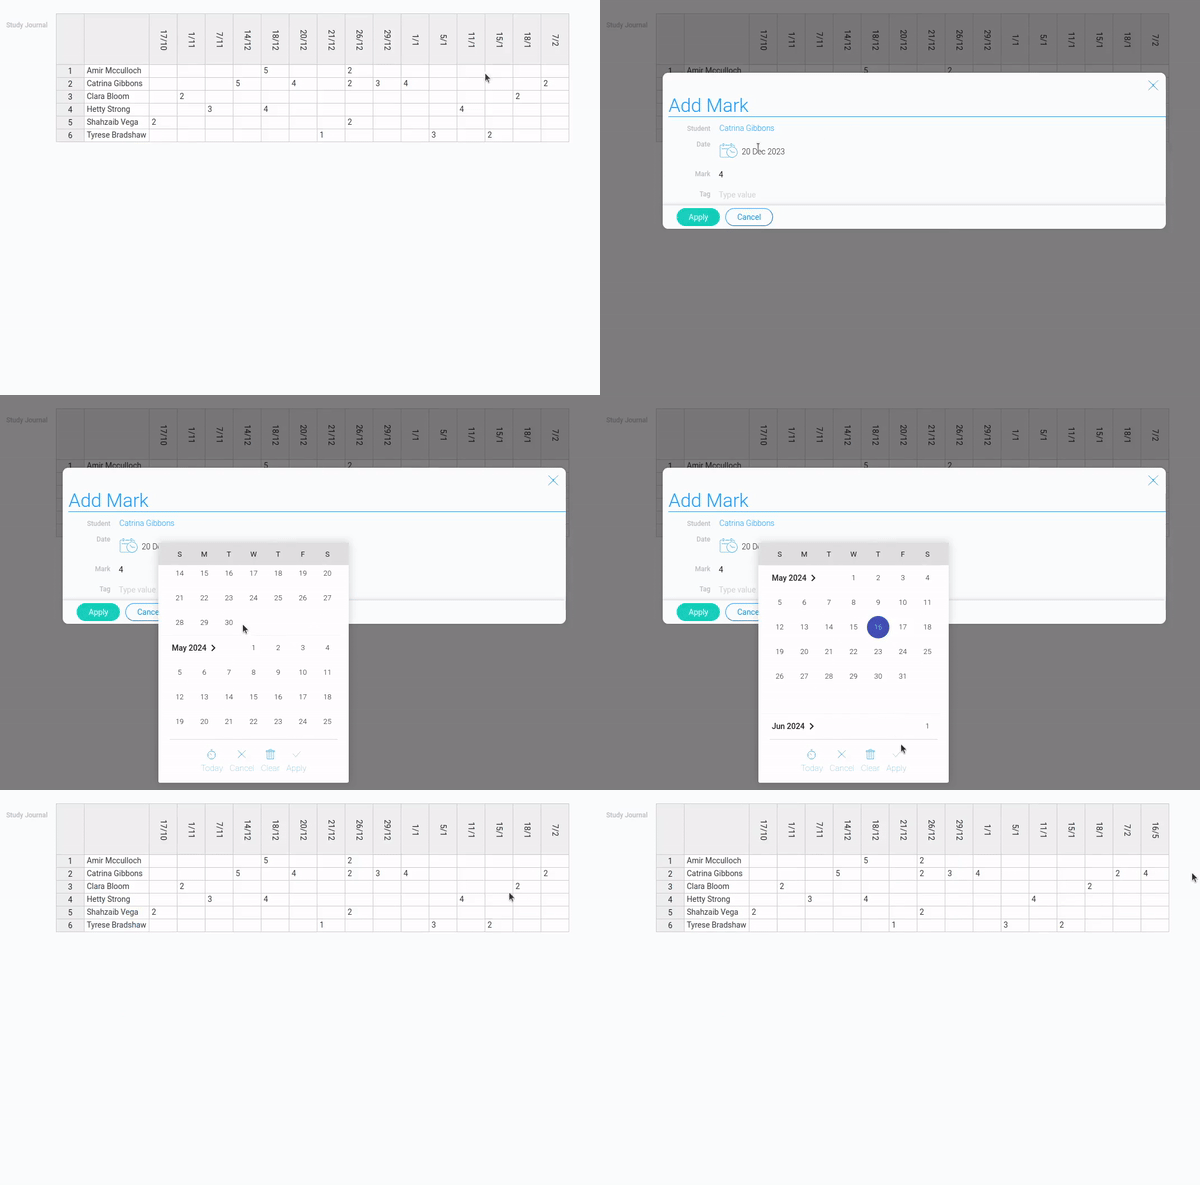
That is, if you have a separate application where you store your planned lessons, you can connect it to the journal using certain settings. After that, columns with the dates of these lessons will appear in the journal. Thus, grades can be assigned only on the dates of these lessons.
This mode is recommended to be used in conjunction with the Study Schedule, which can generate lessons for a specific period of time.
Subject By Dates
The following mode is the only one that allows the journal to display columns for dates for which there are no items in the storage app. That is, it fills in the gaps between dates with empty columns.
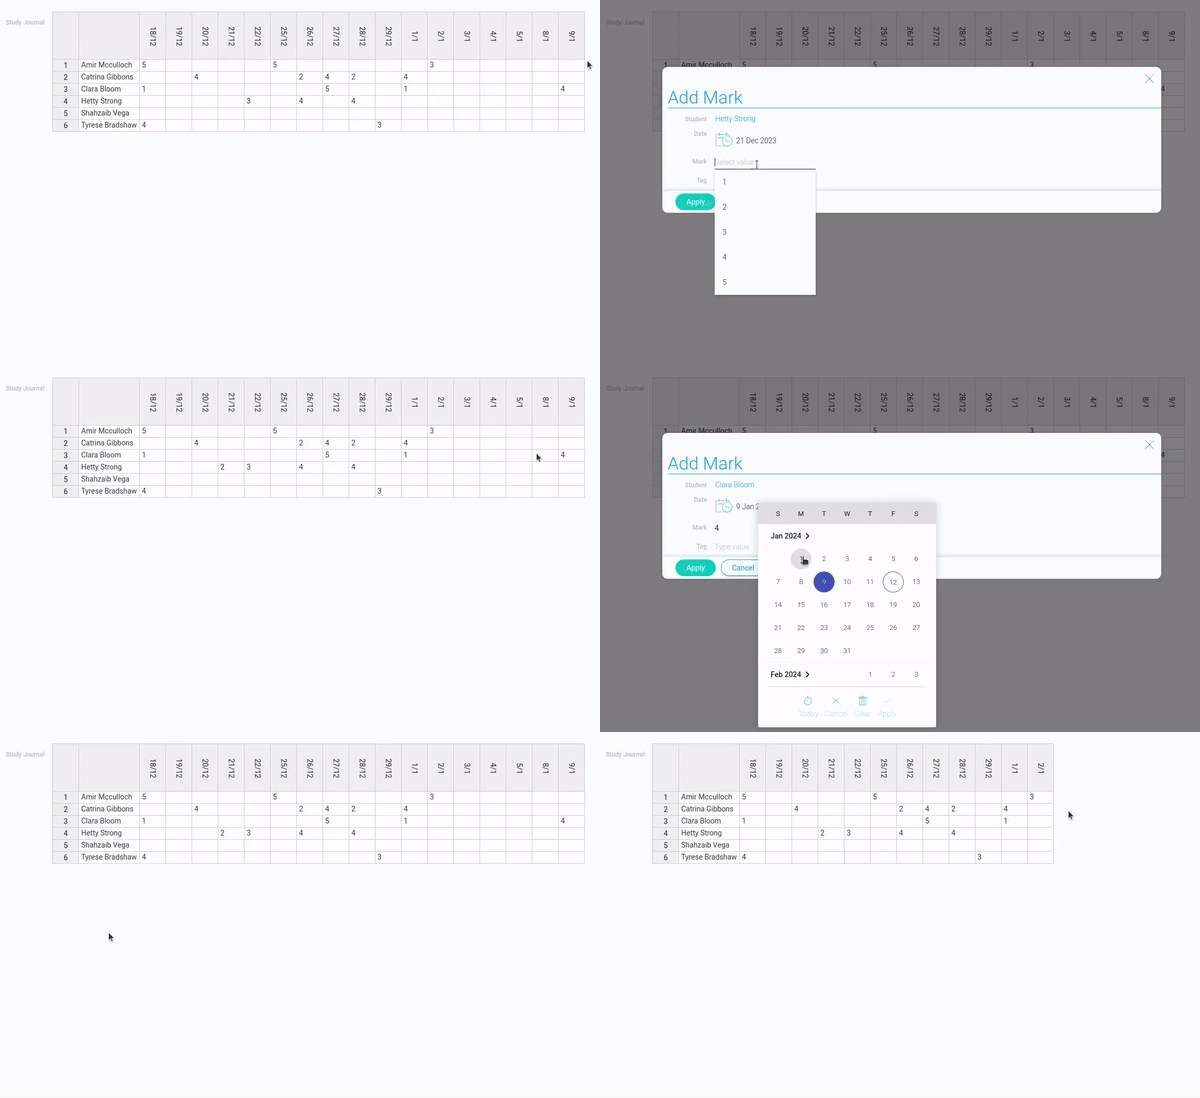
However, if pagination is enabled, the journal will display all dates except weekends as defined in the Show Workdays setting.
This mode is used when you don't have a schedule to pre-generate columns, as in the Subject by Lesson mode.
Student
The last mode of the journal is designed to display the grades of one student. This is realized due to the Student Name that refers to the items of the Student App. Therefore, this mode can only be used in this app. The journal itself filters grades by the item reference from Student Name, or rather displays grades that refer to the current student.
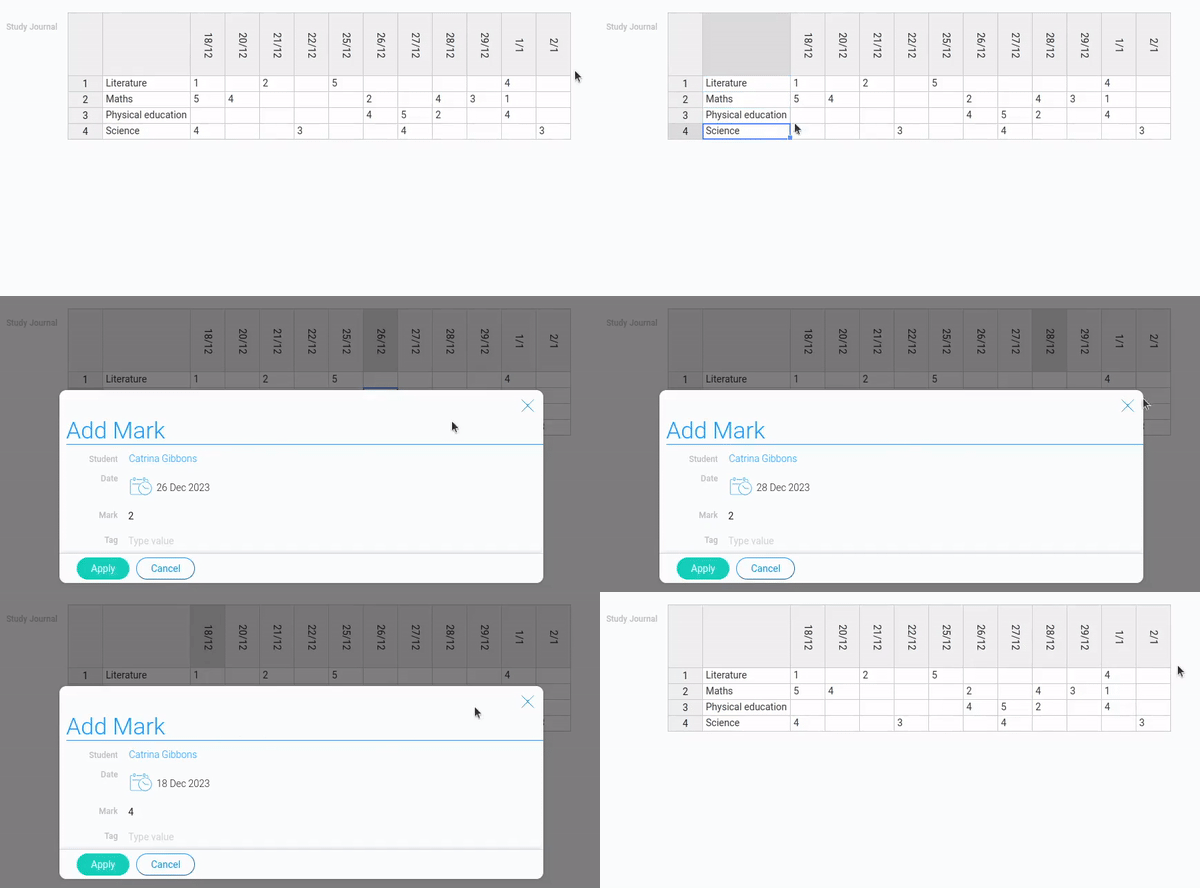
It also creates a subject list instead of a student list. That is, the grades are assigned in relation to the subjects. This is possible due to the Subjects setting, which is available only for this mode. This means that the Journal App items must have a field for selecting a subject.
It only displays columns for existing items in the Journal App.
Element Options
The current gh-element has a large number of settings. All of them are divided into five blocks.
Field Settings, Lesson Settings and Filter
The first block of settings contains three groups. Unlike the other groups, the Field Settings are mandatory. The operation of the entire element depends on them. In turn, other groups are available only when using the Subject by lessons mode.
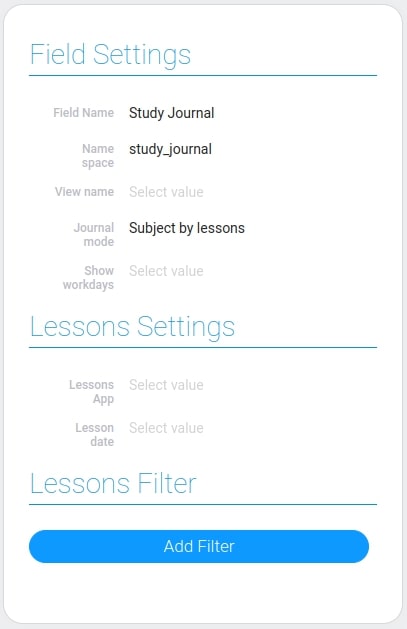
| Name | Description |
|---|---|
| View name | allows you to select a view for adding ratings; details... |
| Journal mode | allows you to select the journal mode; details... |
| Show workdays | allows you to choose the duration of the schedule week; details... |
| Lessons App | allows to select the source application of lessons; details... |
| Lessons date | allows you to select the field that defines the date of the lessons; details... |
| Lessons Filter | allows you to enable filters for lessons that can be displayed in the journal; details... |
View Name
As you already know from the description of the journal, the current item adds marks by creating a corresponding item in a specific application. Here you have to select the view that will open when the user double-clicks on any cell. This is the item view.
The selected view will be opened in a pop-up window.
This view can display fields that the user has to fill in, while other fields will be filled in automatically.
Journal Mode
This is a setting that allows you to select the mode of the journal operation. These modes change both the appearance of the element and the way it works. There are three modes:
- Subject by lessons - displays the grades assigned to the dates of existing lessons. It is used in conjunction with the Study Schedule.
- Subject by dates - displays all date columns, even empty ones.
- Student - displays grades not by student, but by subjects. It is used to display the grades of each individual student.
The operation of each mode is described in more detail in the Functional Characteristics.
The settings also change for different modes. For example, in Subject by lessons mode, a whole group of settings appears called Lessons Settings, and an additional setting appears for Student mode.
Show Workdays
Usually, the journal ignores weekends. That is, they are not displayed. But with the current setting, you can change this. Namely, you can adjust the length of the working week. So, you can select one of three options:
- Show Mon - Fri
- Show Mon - Sat
- Show Mon - Sun
By their names, you can easily understand which days will be displayed. Thus, due Based on the items in this application, columns will be generated in the journal to this setting, weekends can be displayed in your journal.
Lessons App
This setting is created to select the application that stores the lessons that were created in advance. Based on the items in this application, columns will be generated in the journal.
This setting is available only if you are using the Subject by lessons journal mode.
Lessons can be created manually or using the Study Schedule.
Lessons Date
The next setting allows you to select a field that will determine the dates of the columns in the journal. This should be the Date field that stores the date of the lesson. Columns will be created only for dates that exist in the Lesson App.
Lessons Filter
The last setting of the block is responsible for filtering lessons. This setting works similarly to the Filter element. So, here you can add and configure different filters to determine which lessons will be available in the Study Journal.
Students Settings and Filter
The next block of settings generates a list of students for the journal. Due to them, students who do not yet have grades can be displayed in the journal.
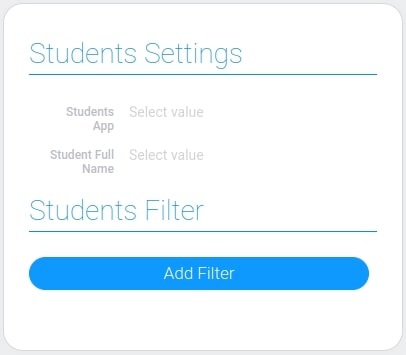
| Name | Description |
|---|---|
| Student App | allows to select the source application of students info; [details...] |
| Student Full Name | allows you to select the field from which the names of students will be obtained; [details...] |
| Students Filter | allows you to customize which students will be displayed in the journal; [details...] |
Student App
This setting allows you to select the application that stores all students and information about them. The data from it will be used to create a list of students. The marks items will be linked to the students' items. Also in this application, you can display the Study Journal in the Student mode, since the Student Name refers to its items.
Student Full Name
Here you have the field from the Student App. This should be a field that contains the student's name. Due to this setting, a list of students will be generated.
Students Filter
This is the setting that allows you to set which students will be displayed in Study Journal. You can do it by configuring the filters. This setting works like the Filter element. It allows you to divide the journal by groups or other criteria.
Journal Settings and Filter
This is the main block of settings that allows you to configure the storage for marks and specify which field will be displayed in the journal.
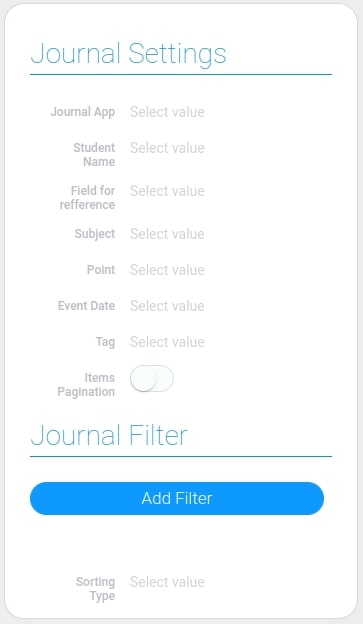
| Name | Description |
|---|---|
| Journal App | allows you to select a application for storing journal information; details... |
| Student Name | allows you to select a field from the journal application in which the names of students are stored; details... |
| Field for reference | allows you to select the field in which the reference to the current item will be stored; details... |
| Subject | allows you to select the field which stores the name of the subject; details... |
| Point | allows you to select the field in which the grades are stored; details... |
| Event Date | allows you to select the field in which the date of the journal item is stored; details... |
| Tag | allows you to select a field that stores an additional name for the lesson; details... |
| Items Pagination | allows you to enable pagination; details... |
| Journal Filter | allows you to define which items will be available in the journal; details... |
| Sorting Type | allows you to specify the type of sorting; details... |
Journal App
The first setting of this block allows you to select one of your applications. It will be used as a storage for the journal.
That is, to customize the current element, you must first prepare an application for it. Each mark corresponds to a specific item in it. This way, all the elements of the marker will be created and saved in the app you select here.
Student Name
This setting is for the name of the student who received the grade. Here you must select the Item Reference field from the Journal application, which refers to the item from the Student App.
In the future, all grade summaries with the same student name will be grouped into one row. Also, this field will be used to generate a personal journal for a particular student when using the Student journal mode.
Field for reference
The current setting is the most important for creating an item in this element. When the user saves the new mark and creates its item in the corresponding application, this field will be filled with a reference to the item in which the Logbook is located.
Also, this setting plays a big role in editing notes. It is this parameter that allows the Journal to find the desired item and then allows you to edit it.
Subject
First of all, this setting is available only for the Student journal mode. Here you have to select the field where stores the subject of the item in Journal App. Subjects will play the role of student names as in other modes. That is, study marks will be grouped into rows by subject.
Due to this setting students can see their personal marks for each subject. In this case, which grades will be displayed is also determined by Student Name.
Point
The next setting allows you to select a field for notes. The value of this field will be displayed in the journal cells.
Here you can use either a simple Text field or the Text Options element with ready-made marks. It is also worth noting that any values can be displayed here, not just numbers.
Event Date
This option is used to set the date for each item. This allows the journal to separate the items by columns. So, here you need to select the field that stores the date of the lesson.
This field will also be filled in when you create a mark item. Accordingly, the date will be determined by the column in which the user clicks on the cell.
Tag
The Tag is a special setting that allows the user to create an additional column on a specific date. This additional column can contain exams or tests. To create it, select any field? for example, Text. If it is filled with a value, an additional column will be created, which will be called the value from this field.
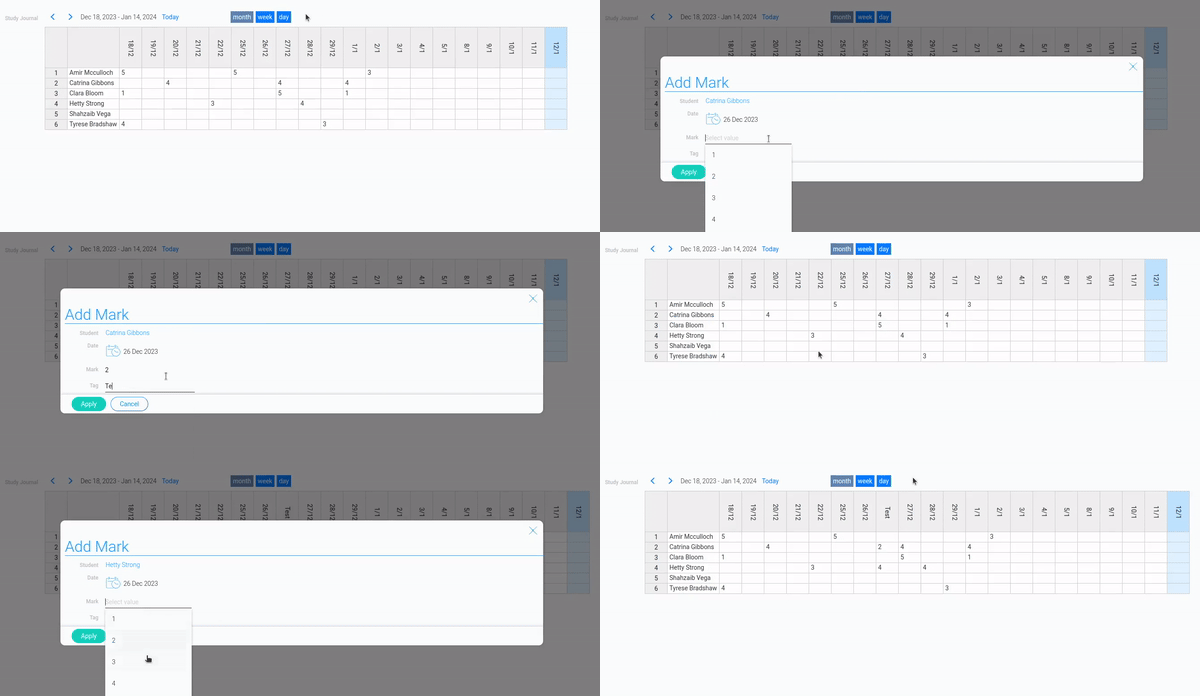
When you create new notes in this column, the selected field will be filled with this name, and the date field will be filled with the date of the column.
Items Pagination
The Item Pagination is a setting that allows you to divide all columns on a page into groups of 4 weeks each. Each page includes a group of columns with specific dates. You can switch between these pages of the journal using the arrows above the table. They also show which period of time is currently displayed. There is also a button that returns the user to the current date.

In addition, pagination provides a useful function to fill in the gaps between columns with existing elements. That is, columns with a date for which there are no items are also displayed.
This feature does not apply to Student mode.
This allows the user to create new notes in empty columns. Thus, if Item Pagination is enabled, the journal will be divided into pages and empty columns will be shown. Otherwise, all items will be displayed at once, and only those columns with items will be shown.

Pagination also provides additional tools for navigating between journal pages. They include buttons for switching between journal pages, dates that the current page includes, and the Today button, which returns the user to the page with the current date. There are also buttons that determine the time period that will be displayed. Namely, the Month button will display dates within 4 weeks. Thus, there can be 16 pages of 4 weeks per year. Accordingly, with the Week button, the page will contain only one week, and with the Day button - one day.
Journal Filter
The last group of this block starts with filters. That is, the current setting contains the Filter element. It allows you to configure filters for the items of the journal application. All these filters will determine which items will be displayed in the journal.
Sorting Type
The last setting of the block is used to select the type of item sorting. It allows you to define the order of rows. There are only two sorting types:
- Ascending
- Descending
Item Creation
Since the journal creates grades in the app, these settings are optional. Here you can set up automatic filling of some fields.

| Name | Description |
|---|---|
| Source Field | allows you to select the field from which data will be transferred; details... |
| Destination Field | allows you to select a field that will be filled with data from the source field; details... |
| Edit | allows you to edit and delete the option; details... |
Source Field
Since there can be fields which have to be filled in with the certain data from the current item, you have to select a source from which the required fields can take data. So, here you have to select the field from the item in which the Journal is located. When creating a new mark item, the value of this field will be duplicated in the [destination field]Select date(#destination-field).
Destination Field
It is logical that for autofill, you first need to select which field will be filled. So, the current setting is for selecting the destination field. It will be filled with data from the corresponding source field when the mark item is created.
Edit
The only purpose of the last setting is to work with the options in the Item Creation. This setting consists of two buttons. One of them allows you to edit the current option, and the other allows you to delete this option.
Element Style
The Study Journal is quite complicated gh-element. That is why its appearance is almost uneditable. There are only a standard set of style settings and only one type of interpretation available.
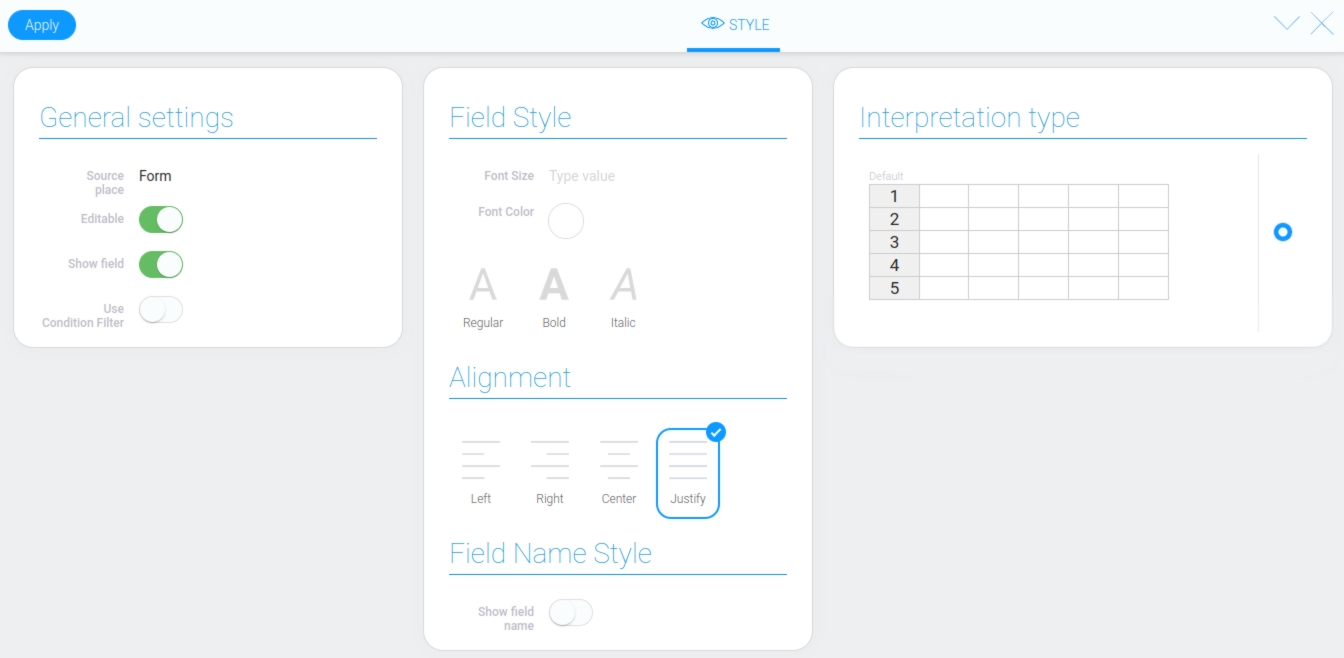
Filtration
No filter can be applied to this element.
Interpretation
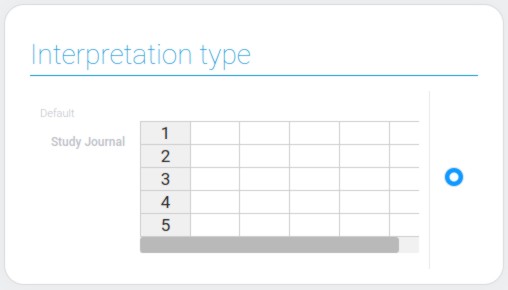
As mentioned above, the type of interpretation has the greatest influence on the appearance of the current element. The Study Journal has only one type of interpretation, which is used by default. It looks like a classic table with interactive cells.
Value Format
This is one of the elements that do not store field values.
Data Model
The current gh-element has a rather large data model:
{
    "data_model": {
        "event_date_field_id": "806679",
        "fieldForReference": "806671",
        "fieldToFieldOptions": [{
            "dest_field_id": "806680",
            "source_field_id": "806230"
        }],
        "interpretation": [],
        "isPaginationEnabled": 1,
        "journal_app_id": "33876",
        "journal_mode": "subjectByDate",
        "lessons_app_id": "33868",
        "lessons_date_field_id": "806235",
        "lessons_filters_list": [],
        "point_field_id": "806669",
        "points_filters_list": [],
        "showWorkdays": "7",
        "sorting_type": "asc",
        "student_name_field_id": "806670",
        "students_app_id": "33802",
        "students_app_name_field_id": "806196",
        "students_filters_list": [],
        "subject_field_id": "806680",
        "tag_field_id": "807064",
        "view_id": "1868951"
    }
}
| Name | Type | Description |
|---|---|---|
| event_date_field_id | string |
contains the identifier of the field that stores the date when the mark was assigned |
| fieldForReference | string |
contains the ID of the field that will be filled with a reference to the current item |
| fieldToFieldOptions | array |
contains all options of the Item Creation settings |
| dest_field_id | string |
contains the ID of the field that will be filled with some data when the item is created |
| source_field_id | string |
contains the ID of the field from which the data for the field from the previous property will be retrieved |
| interpretation | array |
contains all element interpretation types |
| isPaginationEnabled | boolean |
shows whether the items pagination is enabled or not |
| journal_app_id | string |
contains the ID of the application in which the items for the journal will be created and stored |
| journal_mode | string |
contains the identifier of the selected journal mode |
| lessons_app_id | string |
contains the ID of the application that stores all lessons |
| lessons_date_field_id | string |
contains the ID of the field that stores the date of the lesson |
| lessons_filters_list | array |
contains all the filters that are applied to lessons |
| point_field_id | string |
contains the ID of the field in which the mark itself is stored |
| points_filters_list | array |
contains all filters applied to the mark items |
| showWorkdays | string |
contains the number of weekdays that will be displayed in the element |
| sorting_type | string |
contains the selected sorting type of mark items |
| student_name_field_id | string |
contains the ID of the field that stores the name of the student to whom the mark belongs |
| students_app_id | string |
contains the ID of the application where all student data is stored |
| students_app_name_field_id | string |
contains the ID of the field from the application in the previous property that stores the student's name |
| students_filters_list | array |
contains all filters that are applied to students items |
| subject_field_id | string |
contains the ID of the field with the title of the subject |
| tag_field_id | string |
contains the identifier of the field that contains an additional topic for the lesson |
| view_id | string |
contains the ID of the view that will be opened after clicking on the journal cell |

 Edit document