Conversation Element
Conversation is a gh element that allows users to chat in various messengers from the GudHub app. This element makes it possible to connect a specific page or bot in the messenger and correspond with it. That is, the user writes messages in GudHub, and they will be sent from the connected page. And since you can connect many pages and bots of different messengers here, the user can collect all their messengers in one application and switch between them comfortably.
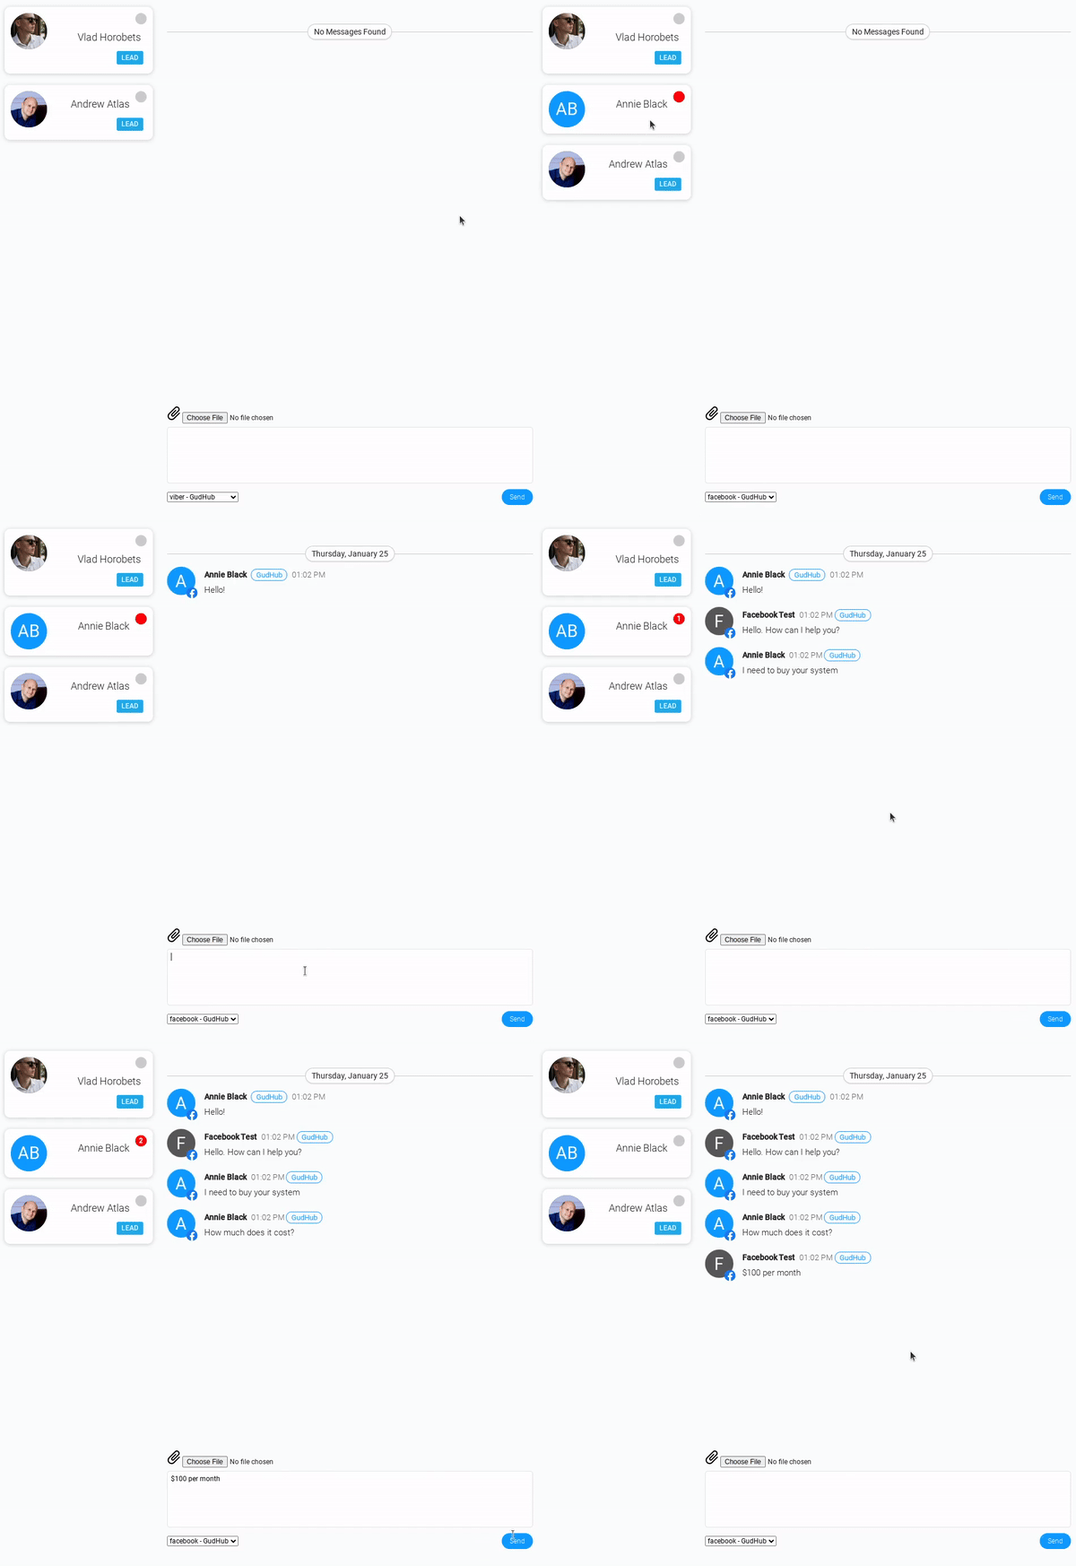
When you open a chat with a specific user, the element automatically switches to the corresponding page or bot. This allows the user not to be confused about which messenger and page to reply from in order for the customer to receive the message. You can see the entire list of connected pages in the drop-down list in the left corner below the input area. You can also manually switch pages here.
In addition, Conversation consists of an area where all messages are displayed, a text input field, a button for attaching files to a message, a button for sending messages, and the same list of messengers. Each message is signed with the sender's name, or rather a nickname. A small profile photo is also displayed there, if available. It is also important that the element receives voice messages but cannot send them. That is, you can listen to them in Conversation.
The element has the functionality to show which messages are unread. To mark them as read, you need to reply to the message. In addition, one interpretation of the element allows you to mark only whether there are unread messages and how many of them there are. Also, items with unread messages in the Conversation will be moved up in the Table or Cards.
Functional Characteristics
The current element has certain features. When someone in the messenger writes to a connected page or launches a bot, an item with the ID of that user will be created in the application with Conversation. Slack is an exception, as it doesn't pull up conversations with a specific user, but rather group conversations.
As already mentioned, the current element is used to correspond with customers in different messengers from one place. This allows the user to make the process of correspondence as convenient as possible, because not only is there no need to log in to different messengers, but also conversations can be linked to a customer's card or something else. That is, if you have your own CRM system in GudHub, you can connect messengers to it.
Usually, it is enough to connect Text and Image elements for Conversation to work. However, if you also use it together with Cards, Avatar, View Container, and its second interpretation, you can make a full-fledged messenger in GudHub. Also, due to the Smart Input, Iterator, and Send Message nodes, less often Send Request, you can set up full-fledged mailings. In addition, it is recommended to take data for mailings from the Text Area and File or Image elements.
Viber
The current gh-element allows you to connect a Viber chatbot to it. That is, you must first create a chatbot in Viber and only then connect it using its token. This way, the chat becomes available when the client launches a bot, and you can respond on behalf of the bot.
Telegram
Telegram works similarly to Viber in Conversation. You can only connect an existing chatbot to an element. Here, too, the connection is made using a bot token. After connecting, customers have to subscribe to your bot. Then the messages will become available in the element and you will be able to reply to customers on behalf of the bot.
In the case of Facebook, you connect your business page to the element. To do this, you need to log in to your Facebook page. After that, you can choose one of the business pages linked to it. This way, when a customer first writes to your business page, GudHub will pull up the conversation with them. After that, you will communicate on behalf of this page.
Slack
Slack is completely different in its functionality from other messengers. First, you need to connect not just a page or a bot to Conversation, but an entire workspace. This will allow users to create groups in this workspace from GudHub. To do this, you need to click on the create button, which is available only if no group is already connected, namely, if the Slack User ID Field is empty.
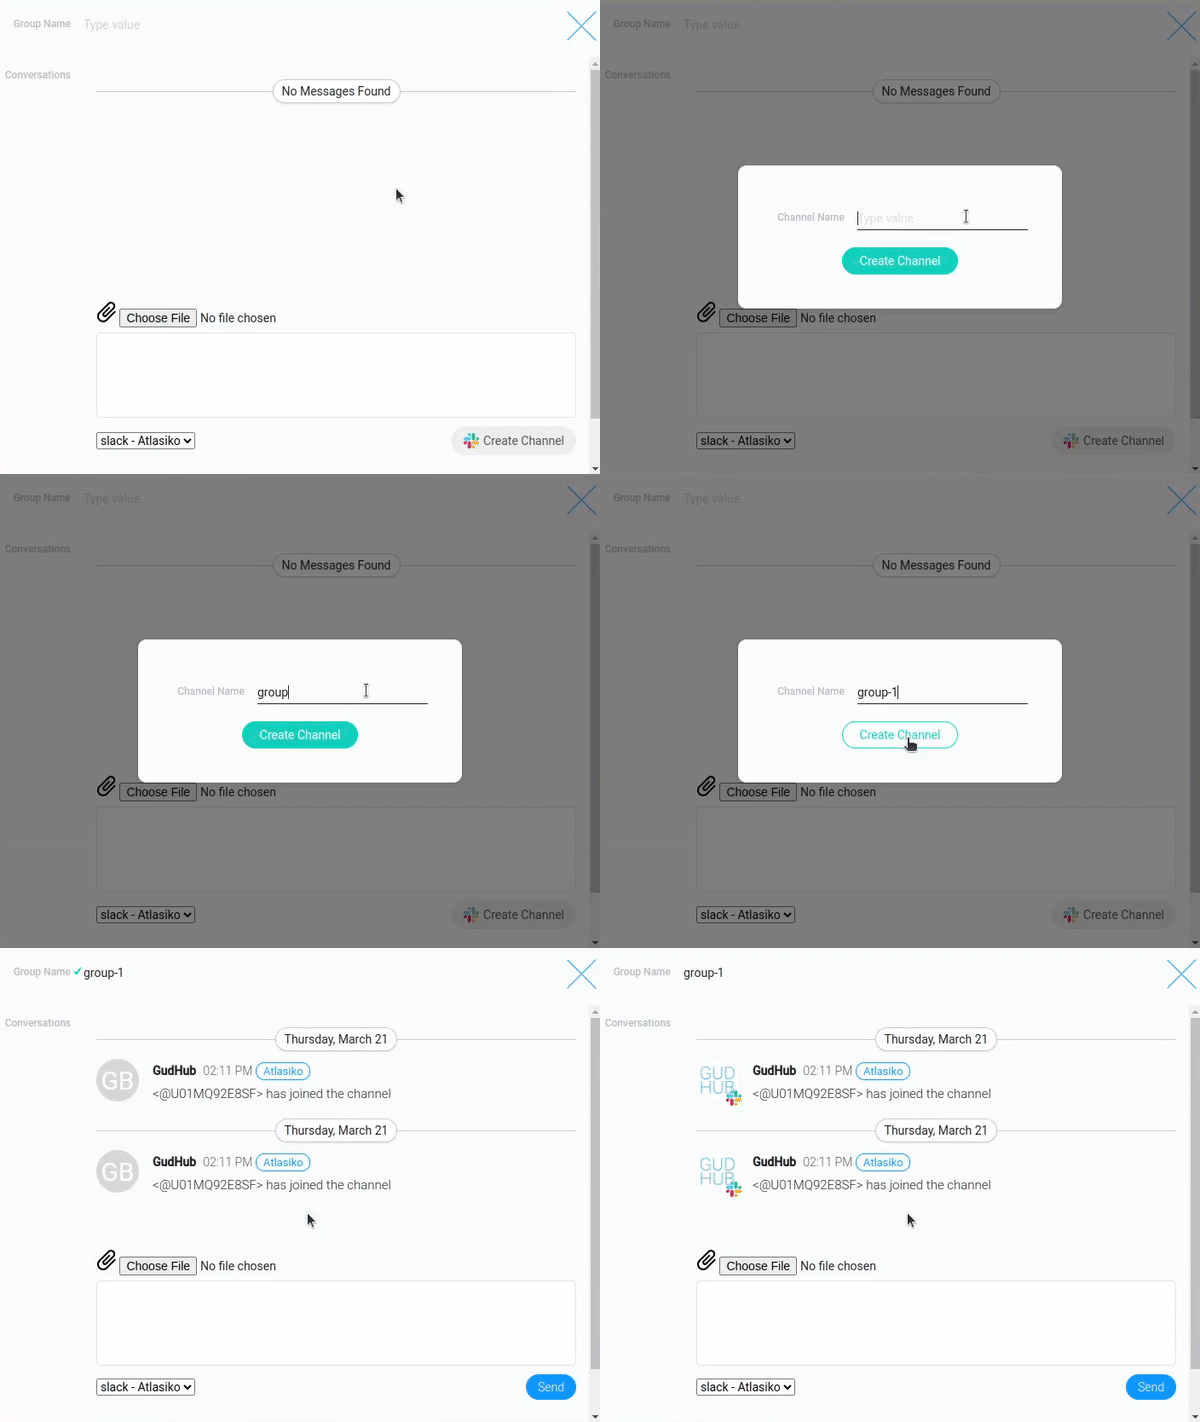
Secondly, in Slack, you write on behalf of your GudHub profile, and it will be displayed in the group in Slack in the same way.
Finally, there is another mode of Slack. It allows you to chat in the thread of one of the messages. To do this, you first need to configure Slack accordingly and enter the group ID in specific field. You need to enter it manually or with the help of automation. This is where the node called Send Request comes in handy. This is the group you want to create a thread in. After doing this, the Create Message button will appear instead of the Send button.
Element Options
The options consist of two blocks of settings. They are generally responsible for similar functionality.
Field Settings
The first set of settings includes two standard element settings and one individual settings for the current gh-element.
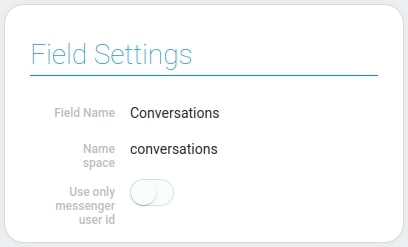
| Name | Description |
|---|---|
| Use only messenger user Id | allows you to get chat only by user ID |
Use Only Messenger User ID
Normally, the current gh element receives chats by application ID, field ID, and user ID. But this setting allows you to receive them only by messenger user ID. This feature allows you to pull up the entire history of correspondence between a bot or page and a specific user. That is, all messages that have ever been pulled up in GudHub, regardless of which application or element they were related to, whether they were deleted or not, will be displayed in this chat.
If this feature is disabled, only messages that were sent after the current item was configured will be displayed. This is because all messages are stored on the server.
Messengers Settings
This is an extensive set of settings that allows you to customize all messengers.

| Name | Description |
|---|---|
| Messenger | allows you to select a messenger to configure; details... |
| Page Name | stores the name of the connected page or bot; details... |
| Setting | allows you to open the connection settings of each messenger; details... |
| Edit | allows you to edit and delete the messenger option; details... |
Messenger
The current setting is the most important for the current block. It determines which messenger the current option will belong to. In addition, the connection settings will differ according to the selected messenger. There are four messengers available for data collection:
To select one of them, click on the field and choose the desired messenger from the drop-down list.
Page Name
This field cannot be filled in manually. This is because it is automatically filled with the name of the connected page. Regardless of which messenger is connected, the name of the page or bot will be displayed here after authorization.
This setting is available only after you have fully configured the messenger settings.
The value of this parameter will also be displayed for users in the list of messengers. This allows the user to recognize and select messenger page from which they can write.
Settings
The next setting, which looks like a gear, allows you to configure the connection of the messenger. Depending on the selected messenger, different groups of settings will open when you click on the current setting. That is, each messenger has its own settings:
Edit
This is a setting that includes two functions. They are both responsible for working with messenger options. These are two buttons that allow you to edit and delete options.
Connection Settings
This are the settings for connecting instant messengers. Messengers have a fairly similar set of settings, but they are individual for each of them.
Viber Settings
This is a block of connecting settings for Viber.
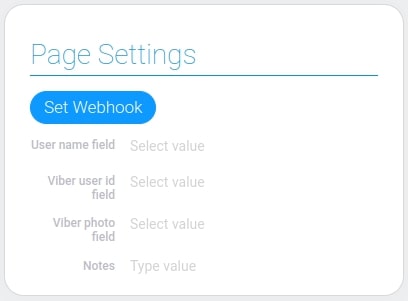
| Name | Description |
|---|---|
| User name field | allows you to select the field for Viber user name; details... |
| Set Webhook | allows you to enter the token of viber bot; details... |
| Viber user id field | allows you to select the field in which the user ID will be stored; details... |
| Viber photo field | allows you to select the field in which the avatar photo will be stored; details... |
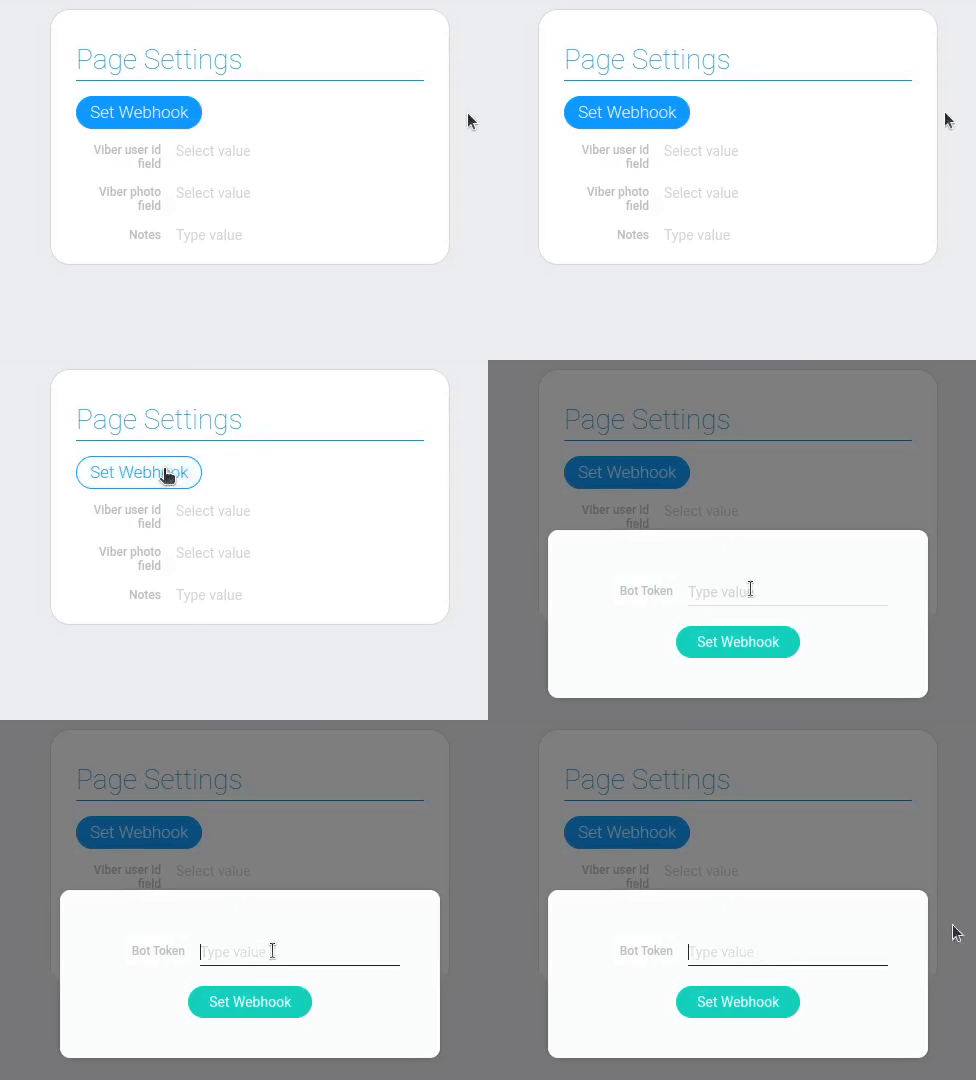
Set Viber Webhook
This is a setting that allows you to connect a Viber bot to an item. This button opens a pop-up window with a field where you have to enter your bot's HTTP API token and save. This will give the Conversation element access to this bot.
Viber User Name Field
When people write to one of the connected pages, their profile names should be stored somewhere to be displayed in chats. So, here you have to select the field where it will be stored. Then the name will be displayed as a nickname in the chat itself from this field.
The user can change any nickname by changing the value in this field.
Viber User ID Field
This setting is responsible for saving the IDs of users who write to the connected page. Here you can select the field where user IDs will be stored. This is necessary in order to extract correspondence with a specific user.
Viber Photo Field
This is the setting where you have to select the field for image of the users profile. This is a profile photo of a user who writes to a connected bot. It is recommended to select the Image field here. The photo from here will be displayed above the user's messages along with the User Name Field.
Telegram Settings
The next block of setting allows you to configure the Telegram connection.
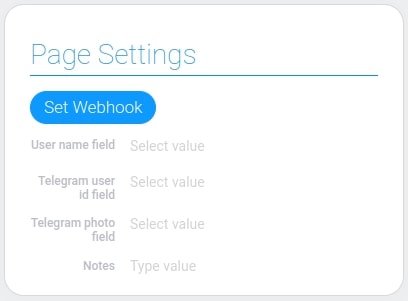
| Name | Description |
|---|---|
| User name field | allows you to select the Telegram user name will be saved; details... |
| Set Webhook | allows you to enter the access token of telegram bot; details... |
| Telegram user id field | allows you to select the field in which the user ID will be stored; details... |
| Telegram photo field | allows you to select the field in which the avatar photo will be stored; details... |
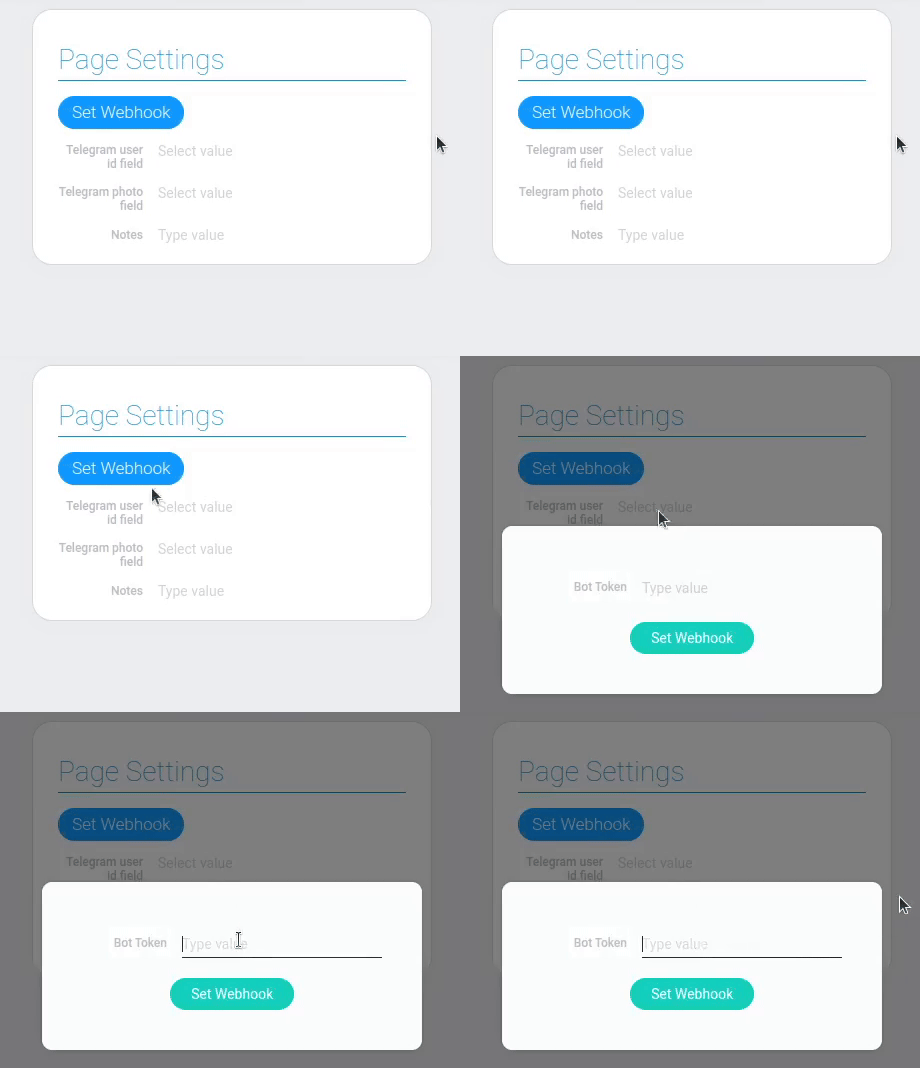
Set Telegram Webhook
This is the setting allows you to connect the Telegram bot to the Conversation. It opens the pop-up window. There is a field for input. That is, you need to enter your bot's token to access the HTTP API and save it.
Telegram User Name Field
This is the setting where you have to choose a destination field for the user's nickname. That is, when the user writes to the connected bot, the current field will be automatically filled in when creating an item.
In addition, if you change this name manually, the new nickname will be displayed in Conversation.
Telegram User ID Field
This setting requires you to select a field for Telegram user IDs. That is, when any user writes to your bot, this field in the newly created item will be filled with the user's Telegram account ID.
Telegram Photo Field
The last setting of the current messenger requires selecting the field where the user's avatar will be stored. This field will store the profile photo of the messenger user who will write to the connected bot. That's why you need to select the Image element here. The image from this field will be displayed beside the User Name in the chat.
Facebook Settings
The current set of settings is for setting up Facebook messenger in the Conversation.
| Name | Description |
|---|---|
| User name field | allows you to select the field for Facebook user name; details... |
| Facebook Login | allows you to connect a Facebook business page; details... |
| Facebook user id field | allows you to select the field in which the user ID will be stored; details... |
| Facebook photo field | allows you to select the field in which the avatar photo will be stored; details... |
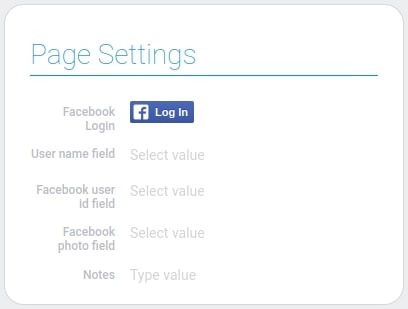
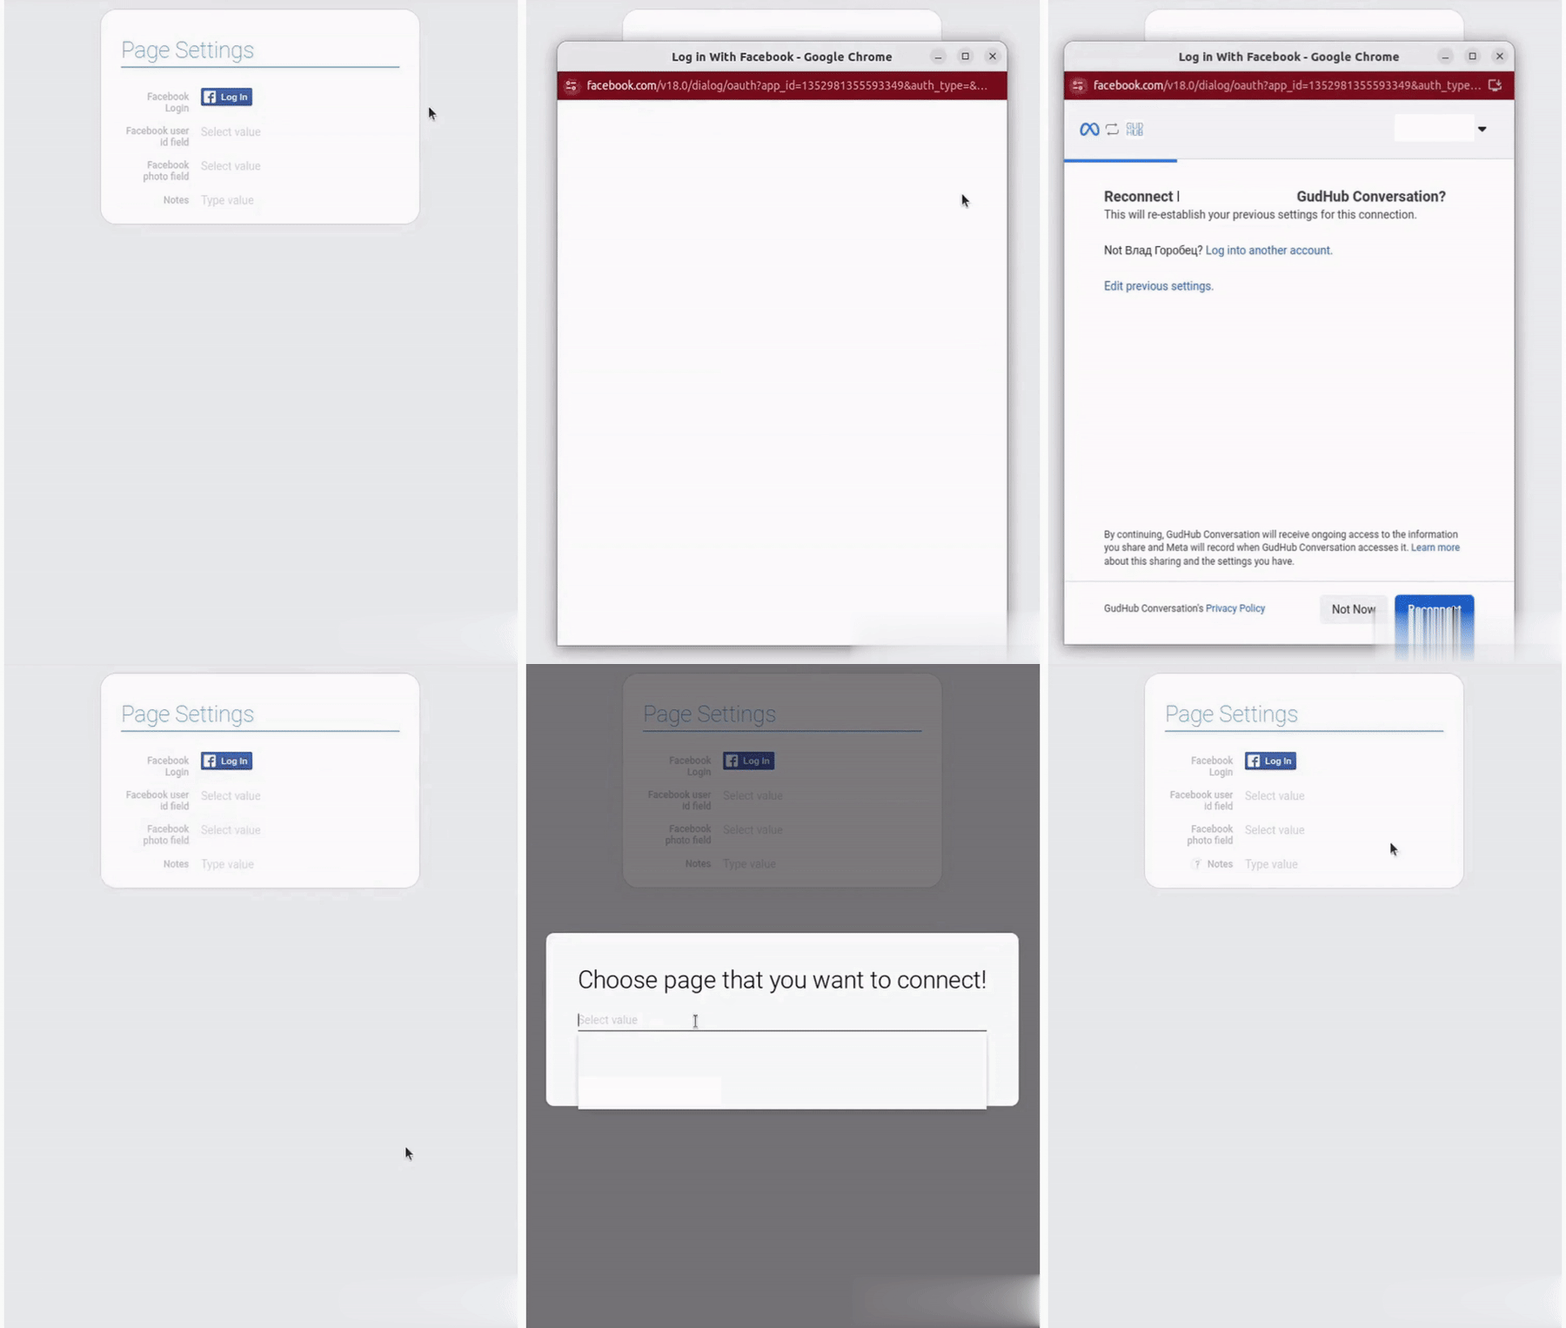
Facebook Login
This is the setting button that allows you to connect your Facebook business page to the current element. Specifically, clicking this button will open the Facebook login page. After authorization, you can select and save one of your business pages.
Facebook User Name Field
This is one of the settings responsible for user nicknames. Here, you need to select the field where the user's name will be stored when they write to the bot. This name will then be pulled up in the Conversation so that the user can change it.
Facebook User ID Field
The next setting is responsible for saving user IDs. That is, here you need to select the field where Facebook user IDs will be stored when they post to the connected business page.
Facebook Photo Field
Here you must select a field for the user's profile photo. The selected field will store the profile photo of the user who posts to the business page. Use the Image element to do this. From here, the photo will be pulled into the correspondence itself along with the User Name Field.
Slack Settings
The last block of connection settings is for the Slack messenger.
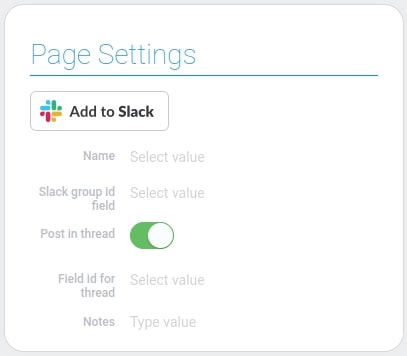
| Name | Description |
|---|---|
| Name | allows you to select the field for the name of the group; details... |
| Add to Slack | allows you to connect the slack workspace; details... |
| Slack user id field | allows you to select the field in which the user ID will be stored; details... |
| Post in thread | allows to send messages in threads; details... |
| Field id for thread | allows you to select the field that will store the message ID; details... |
Add to Slack
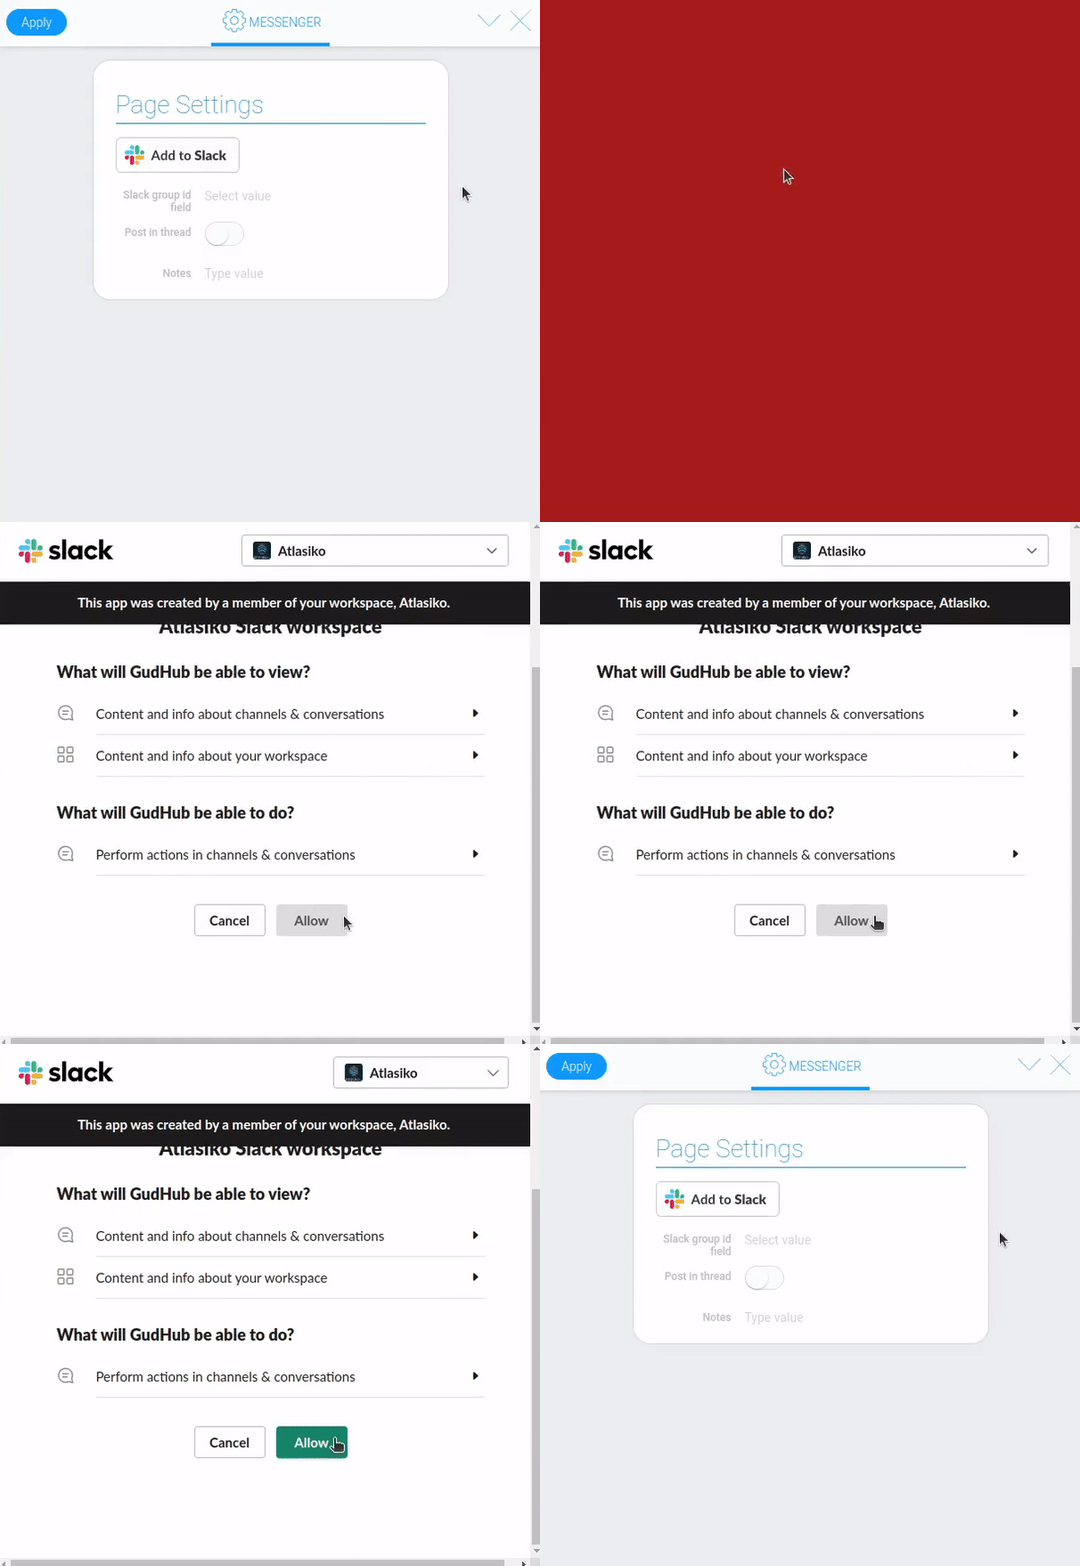
This setting allows you to connect your Slack workspace to Conversation. Slack differs from other messengers in that you don't connect a page from which you'll write, but a whole workspace to create groups there. Users can chat only in created groups.
Slack Name
If you use Slack, this setting plays a slightly different role than similar settings in other messengers. In this case, it saves the name of the group created from Conversation. This is the only case when the name of a ready-made chat is not pulled up, but the name entered immediately when creating the group.
Slack User ID Field
Despite its name, this setting allows you to store the group ID in the connected workspace. Here you should select the field from which the group ID will be taken. This ID is needed to pull up the correspondence from the group and be able to send messages there from the current item. Also, the ID of the newly created group will be saved in the field selected here.
Post in Thread
The current messenger has two modes of operation, and the current setting allows you to switch between them. If this setting is off, you can create groups and communicate in them. If it is enabled, you can only exchange messages in the thread of one of the messages in an existing group.
To communicate in threads, you need to store message IDs. You can do this in the setting that appears when the current setting is enabled.
Field ID for Thread
The last setting requires setting the field from which the message ID for the thread will be taken. Due to this identifier, Conversation understands in which thread the conversation is being conducted. It's also worth noting that unlike the Slack User ID Field, the message ID must be entered manually otr using automation.
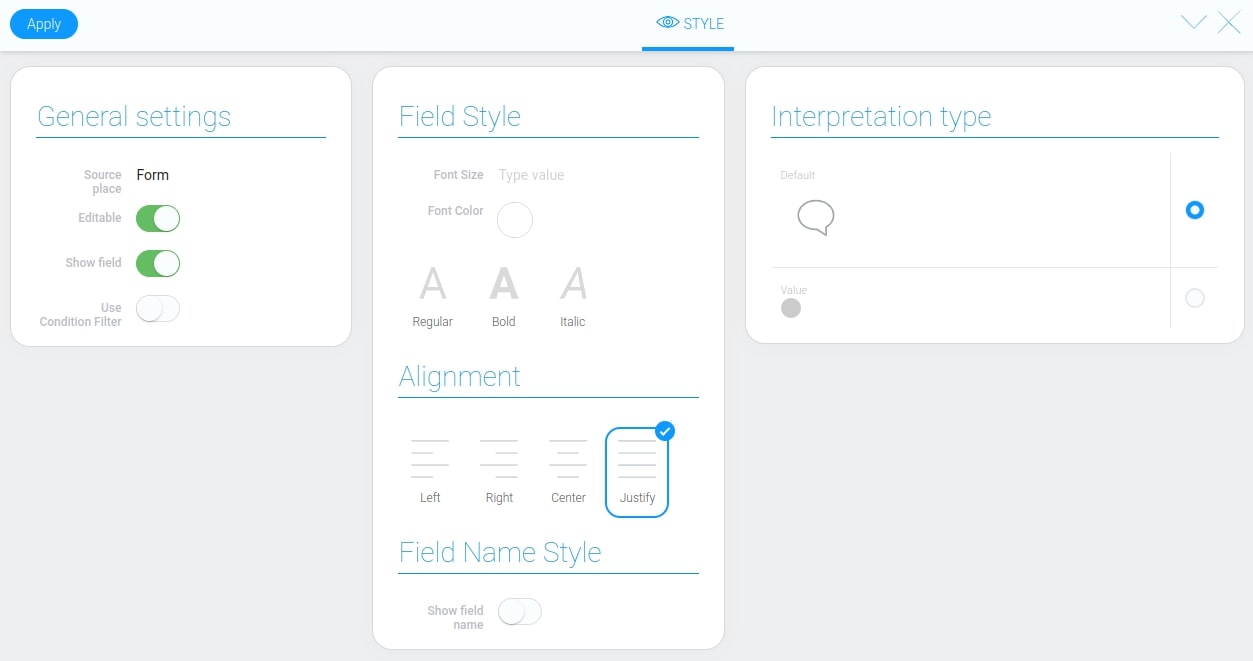
Element Style
The current element style settings consist entirely of standard settings. They do not have much influence on the appearance of Conversation. The same cannot be said about the types of its interpretations. They even determined the way the current element works.
Filtration
It cannot be used for item filtering.
Interpretation
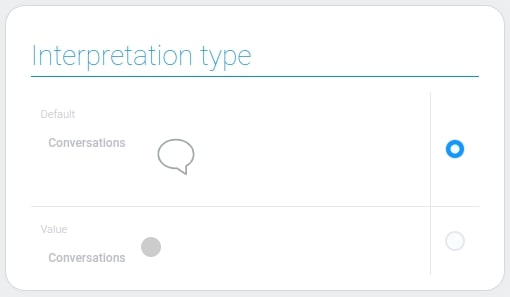
There are two available types of interpretation. They provide different functionality.
Default
The default interpretation types allows the element to be displayed as a chat. Due to that it displays the messages and allows user to send different messages.
Value
The next type displays the element as a grey circle. It allows you to see which item has unread messages. If there are unread messages in any of the items, the circle will turn red and the number of messages will be displayed in its center. By left-clicking on a circle, you can mark messages as read.
Value Format
The Conversation is one of the elements that does not store any value.
Data Model
The data model of the current gh element can be quite large due to the Messenger Settings:
{
    "data_model": {
        "interpretation": [],
        "messengers": [{
            "messenger_name": "viber",
            "messenger_settings": {
                "bot_token": ,"90878hg47naELQSTp0hYWDQmIddhcJyKT1c",
                "messenger": "viber",
                "user_name_field_id": "809929"
                "page_id": 6021963041,
                "page_name": "GudHub test",
                "photo_field": "809933",
                "user_id_field": "809928",
                "webhookSetted": true
            },
            "page_name": "GudHub test"
        }],
        "use_messenger_id": 0
    }
}
| Name | Type | Description |
|---|---|---|
| interpretation | array |
contains all types of element interpretation |
| messengers | array |
contains all configured messengers |
| messenger_name | string |
contains the name of the selected messenger |
| bot_token | string |
contains the token of the bot or page from the messenger |
| messenger | string |
contains the selected messenger |
| user_name_field_id | string |
contains the identifier of the field where the name of the person will be saved |
| page_id | number |
contains the ID of the page from which the messages will be sent |
| page_name | string |
contains the names of the connected page/bot |
| photo_field | string |
contains the ID of the field where the user profile photo is stored |
| user_id_field | string |
contains the ID of the field that stores the user's messenger ID |
| webhookSetted | boolean |
shows whether the webhook is set or not |
| page_name | string |
contains name of the connected page |
| use_messenger_id | boolean |
indicates whether the Use only messenger user ID is enabled |

 Edit document