Go To Item
Go To Item is a node that allows users to switch between items by performing some action. By adding it to the chain of nodes, you can make it so that literally any action leads to some item.
For example, select the Smart Input element in the item view and configure it as a button. In the automation, set up a chain with this node so that when the user clicks on the button, he or she is taken to the next item.

Inputs
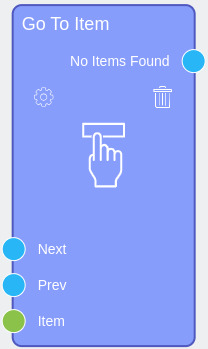
The current node has a set of default input sockets. For most cases, they are not used simultaneously.
Default Input Sockets
The purpose of input sockets is to determine which item the user will go to and in what case. That is depending on which socket you transfers data the you can go to the:
- Next item after the current one in the generated list.
- Previous item before the current one in the configured list.
- Certain item transferred to a node
A specific socket is responsible for each of these options. This allows you to transfer data to all of them at the same time. This way, the user can navigate to different items using different actions.
| Name | Data Type | Description |
|---|---|---|
| Next | value |
is a trigger to move to the next item in the list |
| Prev | value |
is a trigger to move to the previous item in the list |
| Item | items |
accepts a specific item that the user will go to |
Additional Input Sockets
It is not possible to add additional sockets.
Outputs
There is only one output socket available in this node.
Default Output Sockets
The node output socket here is responsible for cases when the element to which you want to go is not found or does not exist. That is, it returns False when there is no item to which node can jump. Such cases can occur if you do not use an Loop by Items.
| Name | Data Type | Description |
|---|---|---|
| No Items Found | returns False in case no items are found to jump to |
Additional Output Sockets
This node has no additional outputs.
Options
The settings of the current gh-element are divided into different groups. Most of them configure the operation of the element.
Default Settings and Send Message
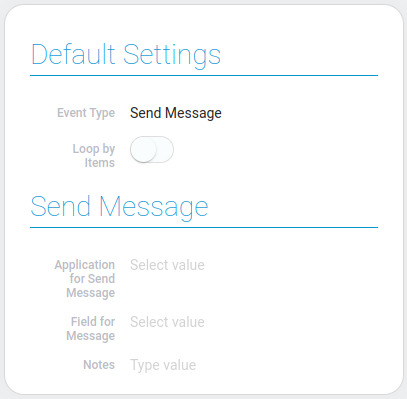
The first block of setting allows you to set the action of the node and configure its operation.

| Name | Description |
|---|---|
| Event Type | allows to select the type of the event; details... |
| Loop by Items | allows you to specify whether items will be repeated in a circle; details... |
| Application for Send Message | allows you to select a application to which a message will be sent from the node; available only for one type of event; details... |
| Field for Message | allows you to select the field to which the message will be sent; only available for a specific type of event; details... |
| Notes | allows you to leave any notes in the node; details... |
Event Type
The current option allows you to select the action that the node will perform. There are two available options:
- Redirect which allows the user to go to a specific item after performing a certain action. It only works with the current application, namely the one where the chain of nodes is located.
- Send Message that sends a message to the selected gh-element after a certain user action. Works with the application selected in the additional settings.
Only when you select the Send Message option do the Send Message settings appear.
Loop By Items
By default, items have a certain order, where the list of items has a beginning and an end. Because of this, there may be nuances at the beginning and end of the list. Namely, when the node should take the user to the previous item from the first item. Accordingly, the item we are trying to navigate to does not exist. The situation is the same with the last item and the jump to the next one.
In such cases, the output socket will return False. But such situations can be prevented by using the Loop By Items. This option allows you to loop the list of items. Thus, the next item to the last will be the first item and vice versa.
Application For Send Message
This is the first setting of the group of additional settings called Send Message. It is available only if the event type is Send Message.
Its purpose is to provide you with a tool for selecting the destination application from your list of applications. This is the application where the message will be sent. Also, you will select the destination field from the list.
Field For Message
As with the previous setting, the current one will be enabled only if the event type is "Send Message". It allows you to select the field to which the message will be sent. This should be a View Container. This is because the purpose of the current node is to switch items. And with these settings, this node allows the user to switch items in the View Container.
Notes
This is a special setting that exists in almost all nodes. It allows you to leave any notes in the node setting. The entered text will be displayed in the node above the input sockets.
Items Settings and Filter
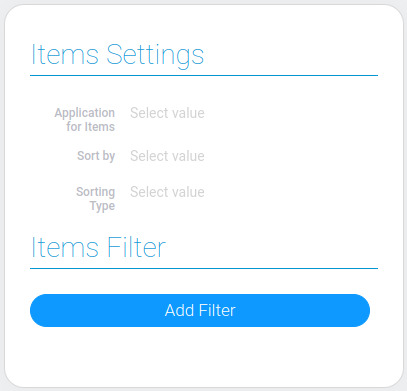
The second block of settings is designed to create a list of products and set their order. This is necessary to determine the next and previous items of the current one.

| Name | Description |
|---|---|
| Application for Items | allows you to select a application whose items will be used to create a list for switching between items; details... |
| Sort by | allows you to sort items in the list by the certain field; details... |
| Sorting Type | allows you to select the type of sorting in the list; details... |
| Items Filter | allows you to select which items will be available in the list and which will not; details... |
Application for Items
This setting allows you to select the application in which the user will switch between items. The items that match the filter of the selected application will be used to create the list. You can then sort it to set the desired order. The user will go through this list.
Sort by
This setting allows you to select the field by which items will be sorted. Any field which stores values fits. Sorting will adjust to the value type. And the order of the items is determined in the next setting.
Sorting Type
In addition to the main items list settings, this setting allows you to set the type of the sorting. There are two of them:
- Ascending
- Descending
These type determines items order. That is, it is logical that, depending on the type chosen, the order can be ascending or descending.
Items Filter
The last element setting allows you to filter items in the list. More specifically, you can set up any filters that will determine the items to be included in the list. At the same time, it defines the items between which the user can switch.

 Edit document