Send Message Node
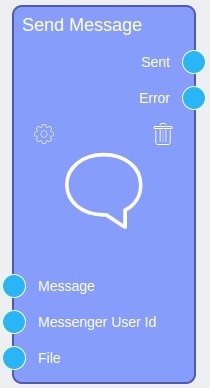
Send Message is a node that allows you to send messages to users messenger. This node works together with the Conversation element and allows the user to send data directly from the items. The most recommended gh-elements for sending messages are the Image and the Text Area, which stores unformatted text.
But note that the node accepts the URL of the file. Therefore, you need to get it first with a File Reader.
Also, if you use this node inside an Iterator, you can perform bulk messaging from one specific account or bot of one of the available messengers.

Inputs
All input sockets of the current node are responsible for sending messages.
Default Input Sockets
The input sockets of the current node are responsible for the recipient and content of the message.
An important nuance is that a node can send only one thing at a time: either a message or a file.
If you send data to the Message and File sockets at the same time, only the data from the Message socket will be sent. Therefore, to avoid confusion, it is better to connect only one of these sockets at a time.
| Name | Data Type | Description |
|---|---|---|
| Message | value |
accepts the content of the email, namely the message text |
| Messenger User Id | value |
accepts the user ID from the selected messenger |
| File | value |
accepts the file that have to be sent |
Additional Input Sockets
There no settings to add the additional sockets.
Outputs
The output sockets provide the results of sending messages.
Default Output Sockets
As already mentioned, output sockets only return the results of sending messages. Only one socket returns a value at a time. If the sending was successful, the Sent socket returns true. If the sending failed, the Error socket returns an z, for example, "Cannot read properties of undefined (reading '0')".
| Name | Data Type | Description |
|---|---|---|
| Sent | value |
returns true if the message was successfully sent |
| Error | value |
returns an error message |
Additional Output Sockets
This node has no additional sockets.
Options
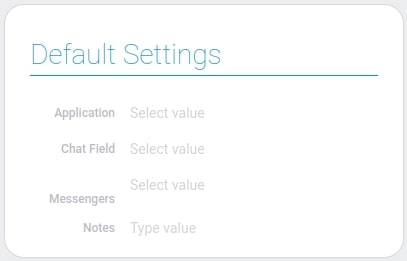
The settings of the current node are responsible for connecting to the Conversation. It also configures which bot from which messenger will send the message.

| Name | Description |
|---|---|
| Application | allows you to select the application in which the Conversation is located; details... |
| Chat Field | allows to select the element to which the message will be sent; details... |
| Messengers | allows you to select one of the messengers configured in the Conversation; details... |
| Notes | allows you to leave any notes in the node settings; details... |
Application
Because the current node connects to a specific Conversation element, you must first select the application in which the desired element is located. Here you can select one of your applications or those to which you have Admin access.
Chat Field
This is the setting where you have to select the Conversation element from the previously selected application. This is how the node will know which messenger to send messages from. That is, it is the Conversation element that stores this data.
This setting also provides that the sent message will be displayed in the chats of the selected element.
Messengers
As mentioned above, the Conversation element contains information about messengers. So, after the preliminary settings, you can choose here the messenger from which you will send messages. Only those messengers that are configured in the selected element will be available here.
Notes
The last setting is common to all nodes. It allows you to save any text in the settings and it will be displayed in the node.

 Edit document